Knowledge points are the single biggest lever on how much gold a Midnight profession makes, and they’re slow to earn. Spend them in the wrong place and you can spend weeks crafting lower-quality items than your competition, or gathering worse materials than everyone around you.
This guide shows real specialization builds from two experienced Gaming Hero gold makers, screenshotted straight from the game, for all eleven Midnight professions. More importantly, it explains why each build is set up the way it is, and what that means for the gold in your bags.
Quick facts
- Covers: all 11 Midnight professions: 3 gathering, 8 crafting.
- Two real strategies: crafting orders for tips, and crafting consumables for the auction house.
- The golden rule: centre node first, then only the branches behind items you actually sell.
- Made a mistake? From patch 12.1 you can reset your knowledge points once per Midnight profession.
How specializations make you gold
Every point you spend gives you skill (higher-quality results) and often a profession stat such as Multicraft, Resourcefulness, Ingenuity, Finesse or Perception. In practice that comes down to three things:
- Quality. Higher skill means higher-quality materials and crafts. Top-quality items sell for far more, and top-quality gear is what players actually place orders for.
- Efficiency. Resourcefulness and Multicraft mean you use fewer reagents, or get extra items for free. On items you craft in bulk, that is pure profit.
- Access. Many nodes unlock new recipes, bonus drops (like rare skinning reagents or motes) or quality-of-life perks such as gathering while mounted.
The centre node of every tree is almost always the best first buy. It gives the biggest chunk of skill for that whole tree and unlocks the branches underneath. After that, only spend in branches behind items you actually sell. Spreading points evenly is the most common mistake we see.
Two crafting strategies that both work
Before you spend a single crafting point, decide how you want that profession to make gold. The two builds in this guide follow two very different, and equally profitable, approaches.
Strategy 1: Crafting orders and tips
Erosium specced every one of his crafting professions toward top-quality equipment, so he could craft raid gear for his guild through the crafting order (work order) station.
- Guildies typically tip 5,000 to 20,000 gold per craft for high-end gear.
- He fills roughly 50 to 100 of these orders every new season. At even a modest average tip, that’s hundreds of thousands of gold, with the customer supplying most of the reagents.
- He doesn’t even advertise in Trade Chat. If you do offer your services there, or in public crafting orders, you can earn even more.
Best for: players in an active guild or community, and anyone who prefers big, lumpy paydays without managing auction house stock. It’s strongest at the start of each season, when everyone needs new gear at once.
Strategy 2: Consumables for the auction house
Tina specced toward items players use up: potions, flasks, reagents and gathering materials. These are things she can use herself and sell on the auction house every week.
- Consumables never stop selling. Raiders and Mythic+ players burn through them every single week.
- Efficiency stats like Resourcefulness and Multicraft matter far more here, because you’re crafting in volume.
- It suits players who enjoy the auction house side of gold making, and it’s steadier income across the whole season.
Best for: auction house players who want a steady weekly income rather than big spikes.
You can absolutely mix the two: gear-focused on one crafter, consumable-focused on another. That’s exactly what we do across our alts.
Gathering professions
For gatherers, skill is king. Higher skill means more of your gathers come out at the top quality rank, and top-quality materials are what crafters chasing max-quality gear will pay a premium for. Gathering builds are about raising skill first, then adding the extras (motes, rare reagents, convenience) that boost gold per hour.
Skinning
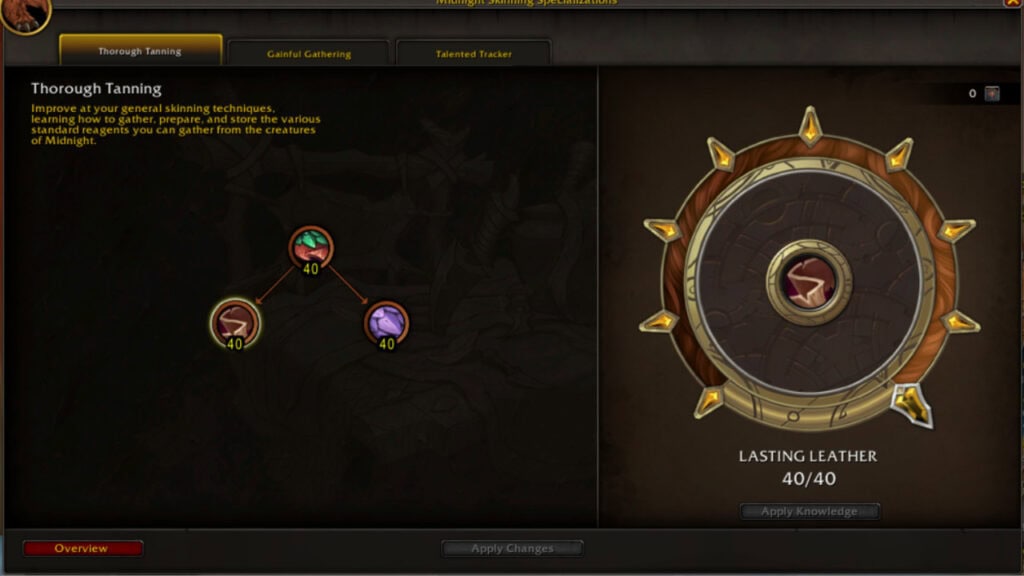
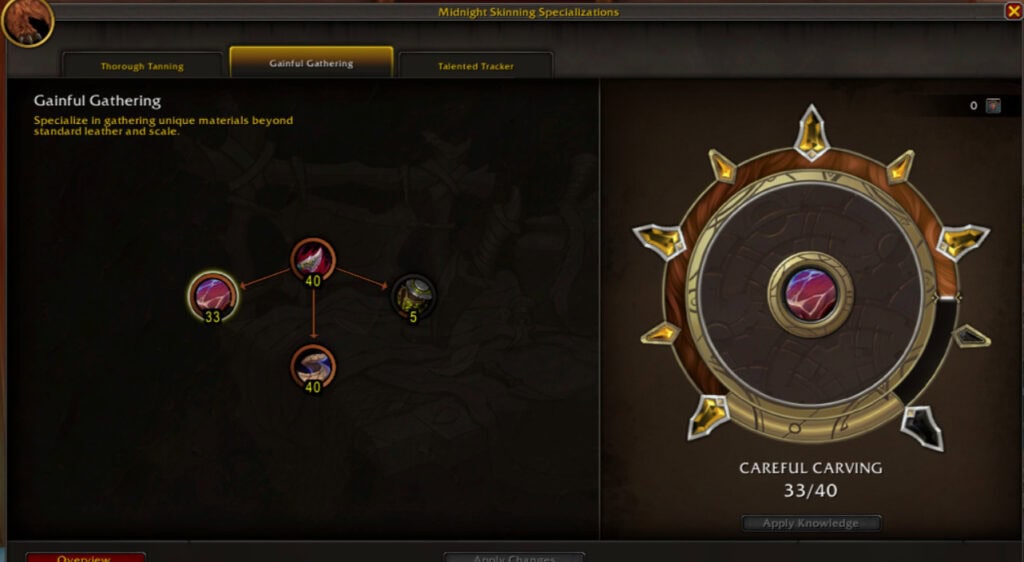
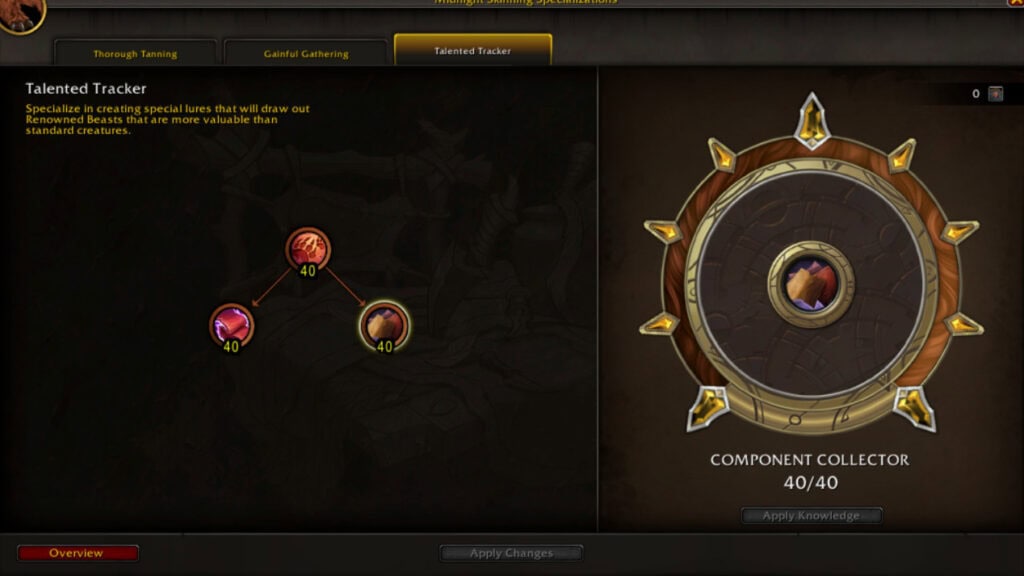
Midnight Skinning has three trees. Thorough Tanning covers standard leather and scales. Gainful Gathering covers everything beyond them: meat, species-specific reagents and diffusers. Talented Tracker focuses on lures that draw out more valuable Renowned Beasts.
- Thorough Tanning: max the centre, then the leather and scale nodes. This is your skill and your bread-and-butter income.
- Gainful Gathering: put in the 10 points needed to open the branches, then go into Trophy Taker for species-specific rare reagents. Careful Carving is mainly for meat, so skip it unless you supply cooks.
- Talented Tracker last, once you want to hunt high-value beasts with lures.
💰 What it means for your gold: Leather and scales sell in bulk every day, so maxing Thorough Tanning gives you a reliable baseline. Trophy Taker turns the occasional kill into a big payday, because rare reagents like Peerless Plumage and Fantastic Fur are what top crafts need. Full farming spots are in our Midnight Skinning guide.
Herbalism
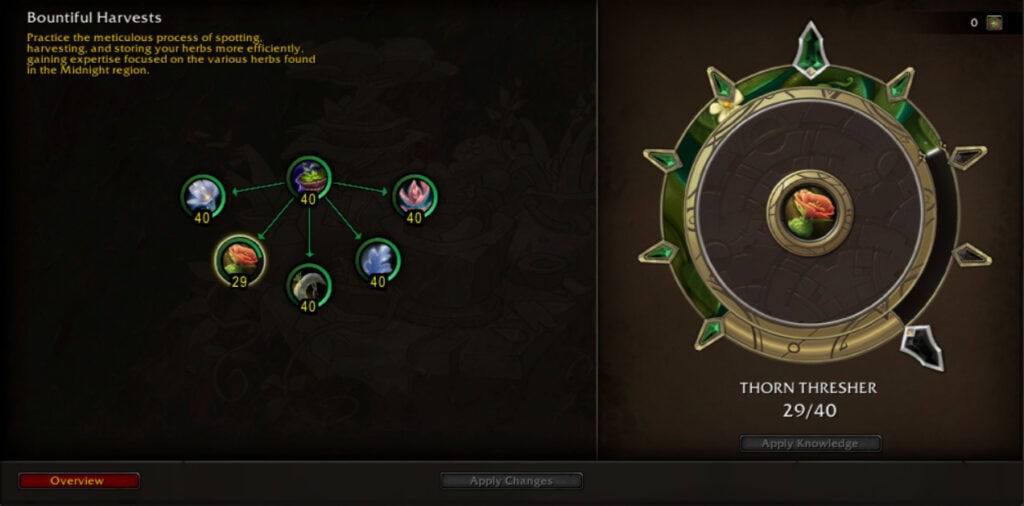
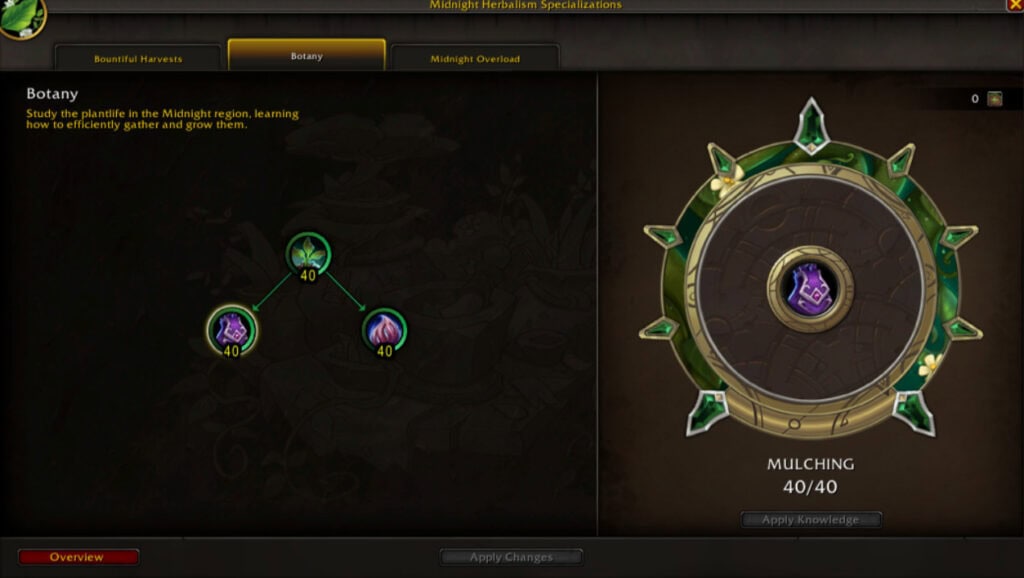
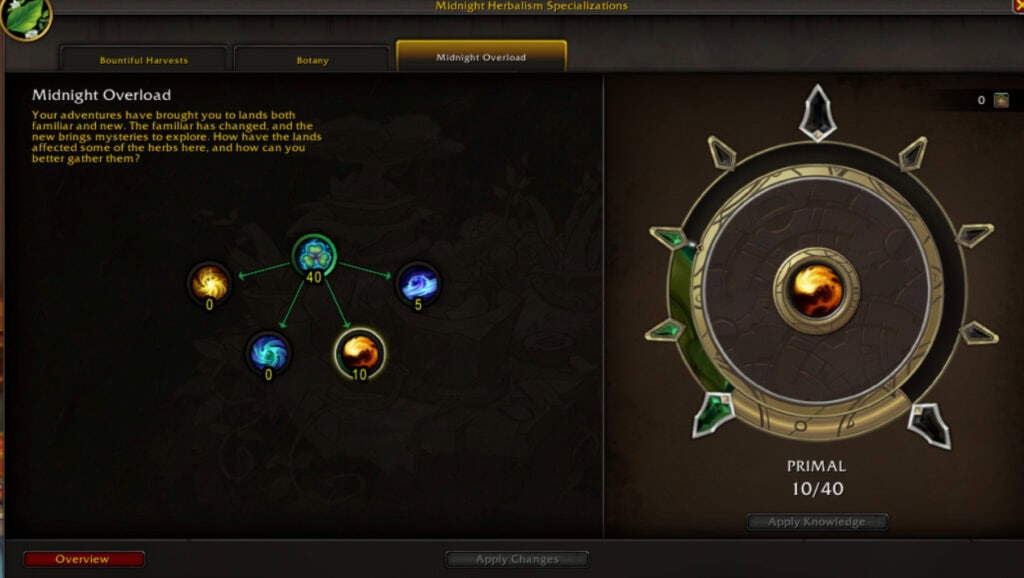
Bountiful Harvests gives you skill with each Midnight herb. Botany covers how efficiently you gather and grow plantlife. Midnight Overload lets you overload special nodes for bonus motes.
- Bountiful Harvests: max the centre, then the herb nodes. Herbs are no longer zone-specific in Midnight, so you’ll pick every type everywhere.
- Botany: max it next for more gathering efficiency.
- Midnight Overload: max the centre, then the branch for the mote type you want to farm.
💰 What it means for your gold: Herbs are the backbone of every flask and potion, so demand never stops. More skill means more top-quality herbs, which alchemists pay extra for. Overload adds motes on top of your normal herbs, so you earn from the same route twice. See our Midnight Mining & Herbalism routes.
Mining
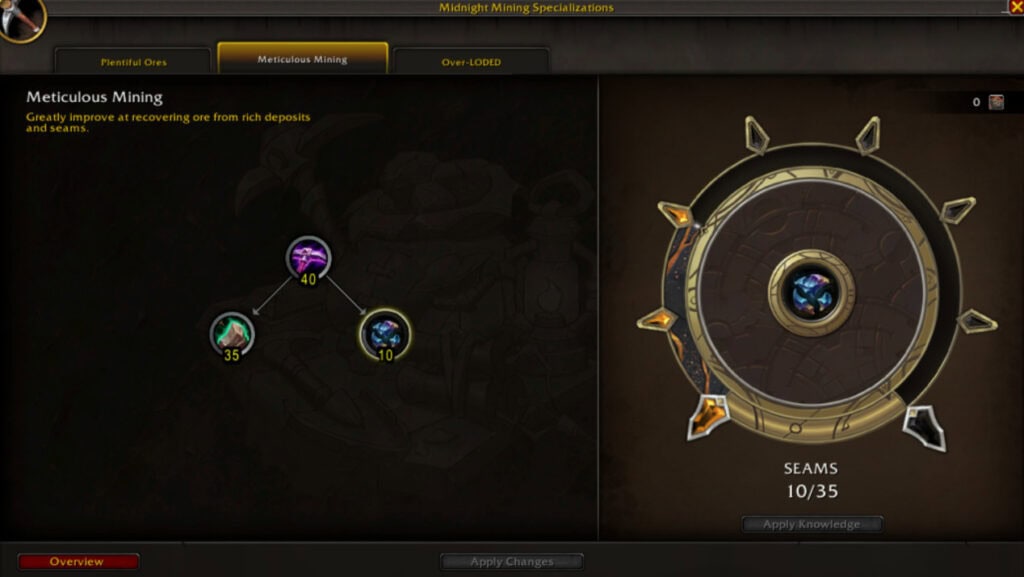
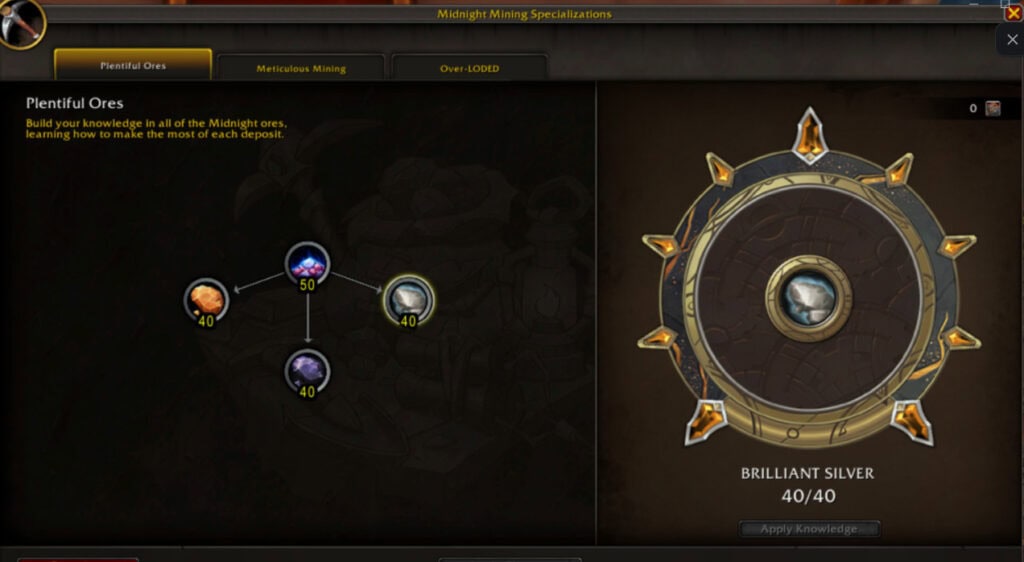
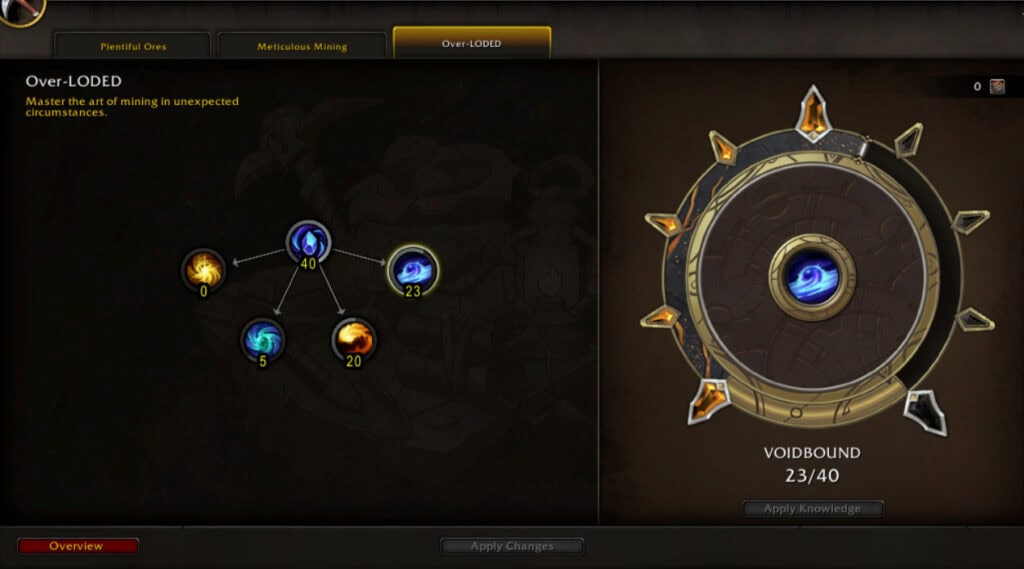
Meticulous Mining improves recovering ore from rich deposits and seams, and unlocks mining while mounted. Plentiful Ores builds skill with every Midnight ore. Over-LODED is the overload tree for motes.
- Meticulous Mining: 40 in the centre first. Mining without dismounting is a huge time saver on every route.
- Plentiful Ores: max the centre (50), then each ore at 40 for skill.
- Over-LODED: the centre, then the branch for the motes you farm.
💰 What it means for your gold: Mounted mining alone raises your gold per hour, because you hit far more nodes in the same session. After that, skill means higher-quality ore for blacksmiths, engineers and jewelcrafters chasing top-quality crafts.
Crafting professions
Each crafting profession below says which of the two strategies the build follows: crafting orders (top-quality gear for tips) or auction house (consumables and reagents in volume). Use whichever matches how you want to play.
Tailoring (crafting orders build)
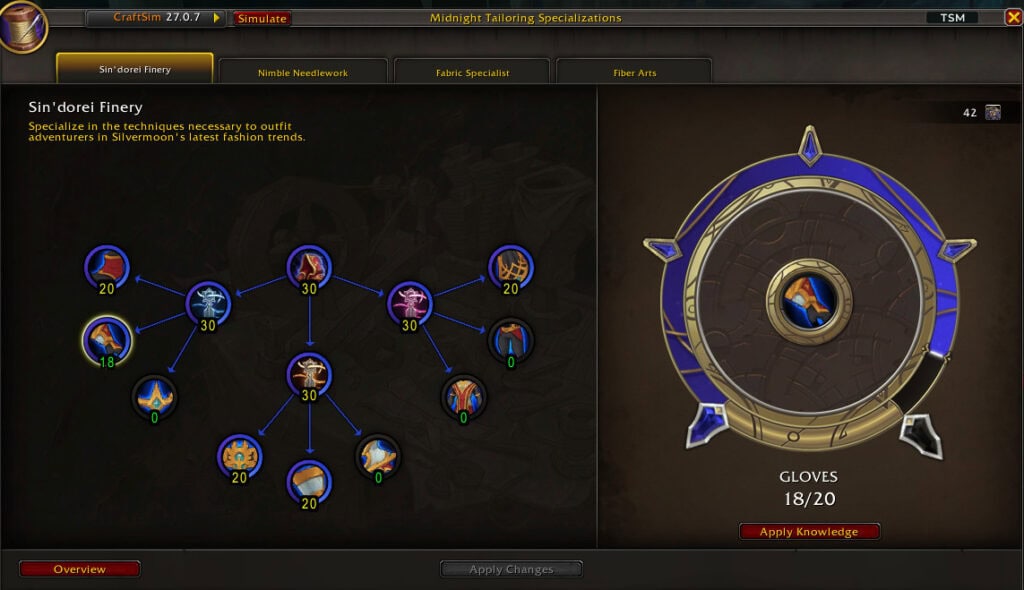
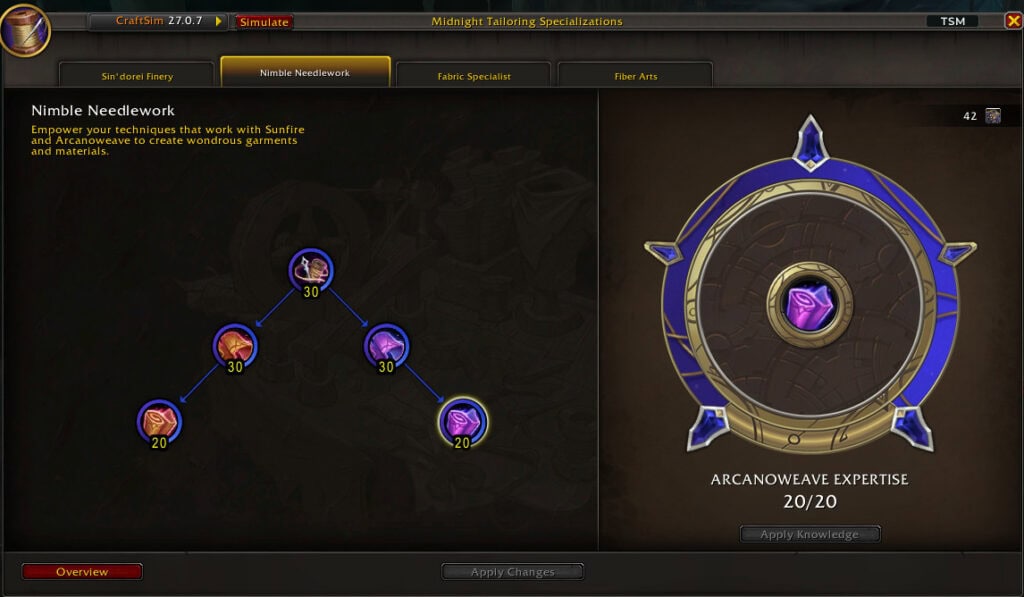
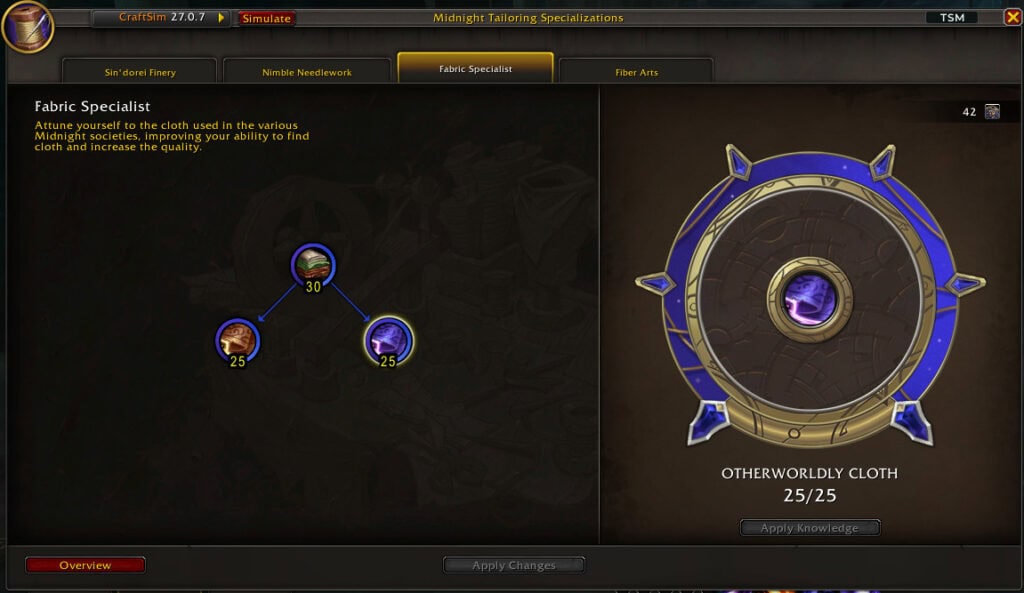
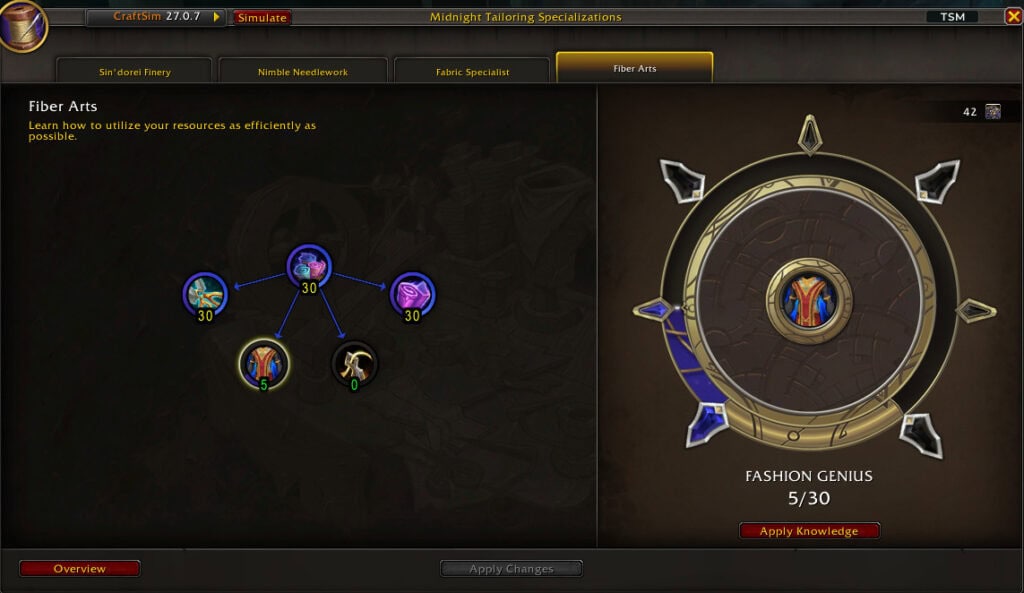
Sin’dorei Finery is the gear tree: robes, gloves, cloaks and so on. Nimble Needlework covers Sunfire and Arcanoweave, the specialty cloths used in high-end crafts. Fabric Specialist improves the cloth you find and its quality. Fiber Arts is about using your resources as efficiently as possible.
- Sin’dorei Finery: the centre, then the gear slots you get orders for. Skill here decides whether you can hit top quality on raid-level crafts.
- Nimble Needlework: unlock Sunfire and Arcanoweave, since top gear needs them.
- Fabric Specialist: more and better cloth from every humanoid you kill.
- Fiber Arts: efficiency, once the essentials are done.
💰 What it means for your gold: Gear orders are where tailoring tips are biggest. A guildie will happily tip thousands for a max-quality robe. Fabric Specialist also means you farm your own cloth, which cuts your costs on every craft. More in Pumping Gold with Tailoring and Midnight Cloth Farming.
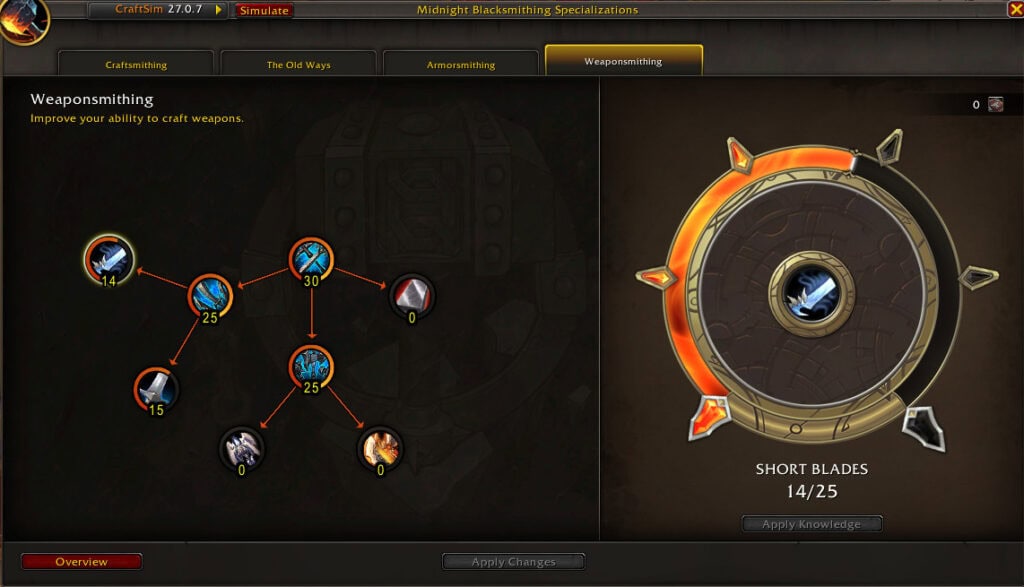
Blacksmithing (crafting orders build)
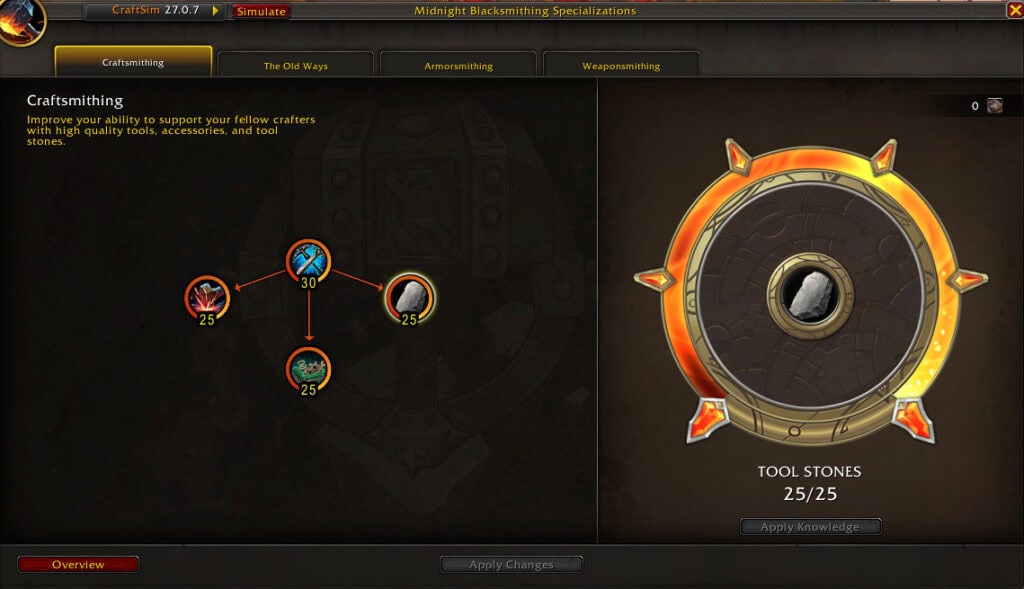
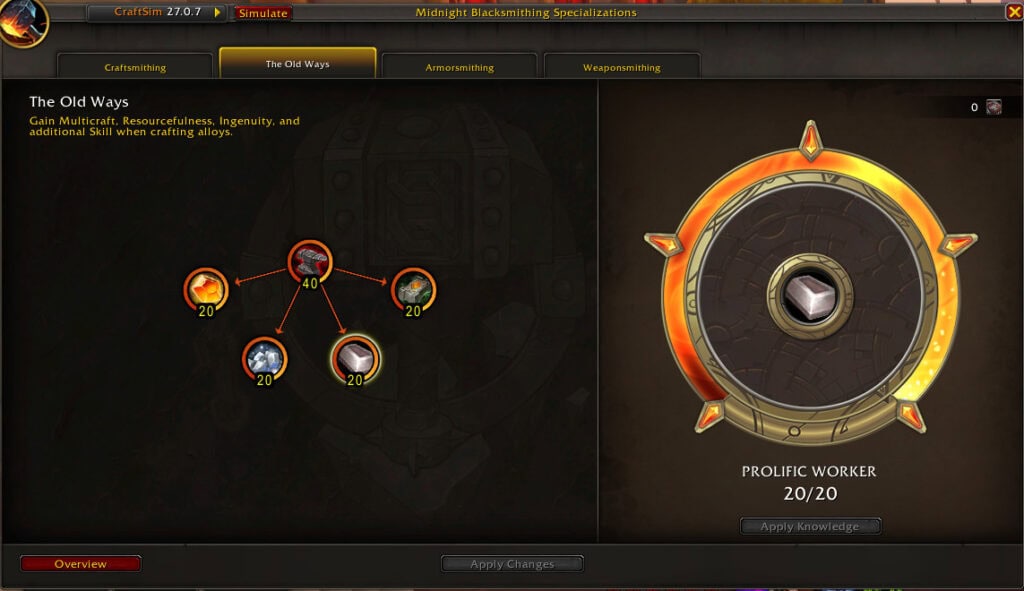
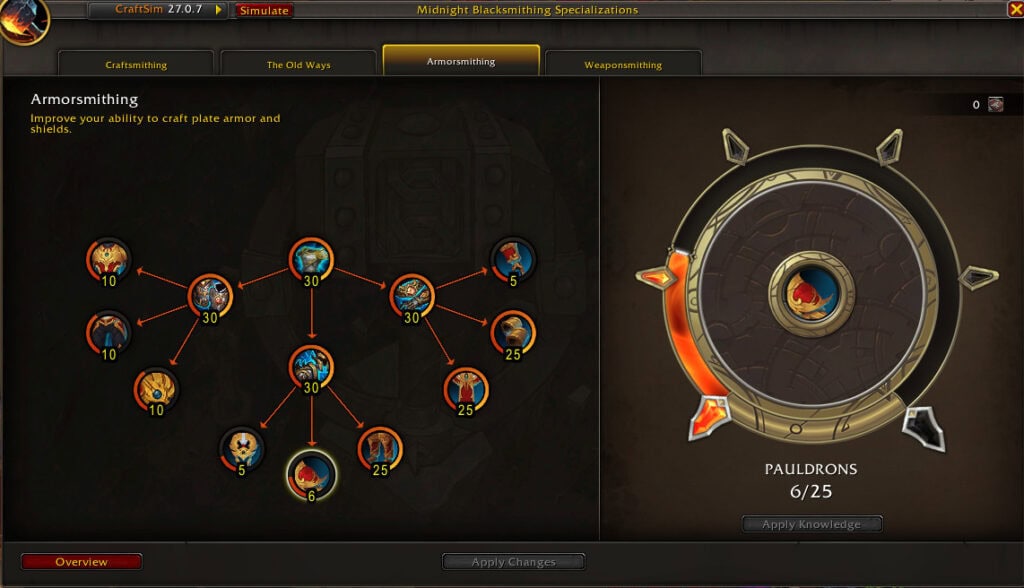
Craftsmithing covers tools, accessories and tool stones for other crafters. The Old Ways adds Multicraft, Resourcefulness, Ingenuity and skill when crafting alloys. Armorsmithing and Weaponsmithing cover plate armour, shields and weapons.
- Craftsmithing and The Old Ways maxed first. Every profession needs tools and accessories, and alloys feed into almost everything you make.
- Armorsmithing and Weaponsmithing: the centre nodes, then only the slots you actually get orders for.
💰 What it means for your gold: Profession tools and accessories are some of the most requested crafts each new season, because every crafter in the game wants max-quality gear for their own profession. Weapons and armour orders then bring big raid-season tips.
Leatherworking (crafting orders build)
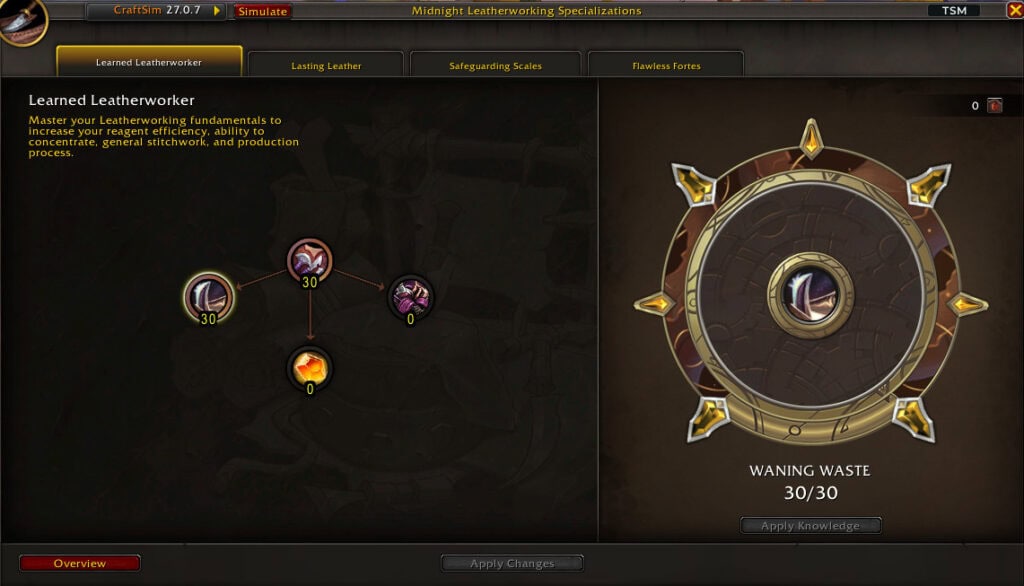
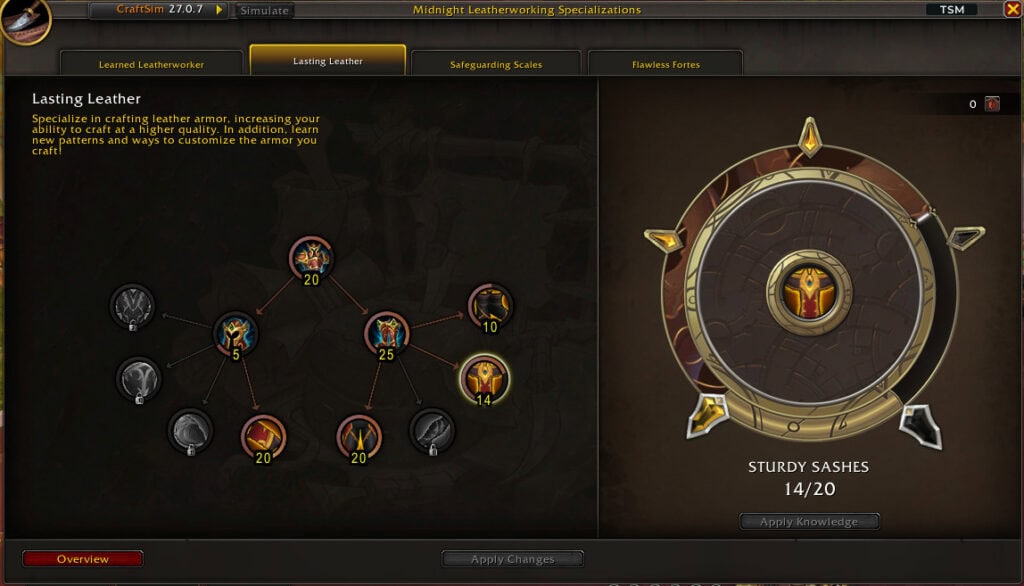
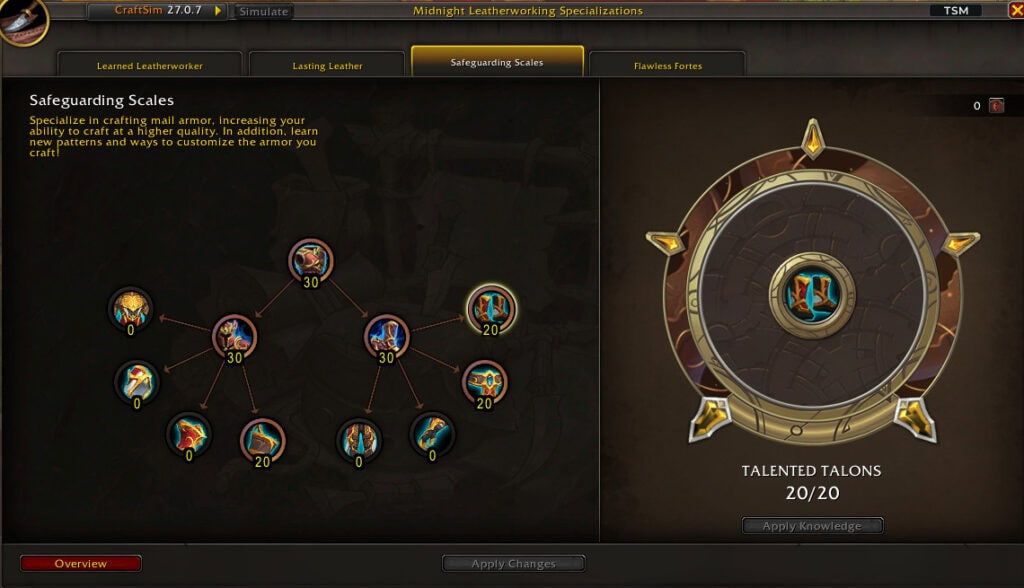
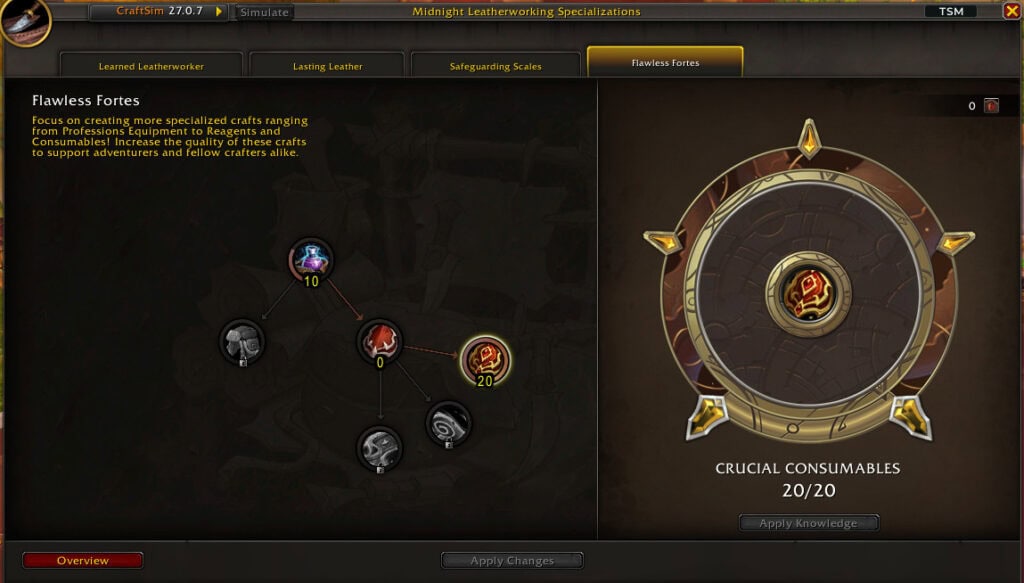
Learned Leatherworker covers your fundamentals: reagent efficiency, concentration and production. Lasting Leather is leather armour, Safeguarding Scales is mail armour, and Flawless Fortes covers profession equipment, reagents and consumables.
- Learned Leatherworker: max it first, because its efficiency and concentration bonuses help every single craft.
- Then Lasting Leather or Safeguarding Scales, depending on whether you want leather or mail orders. These trees come from two of Erosium’s leatherworkers, each specced for different armour.
- Flawless Fortes for consumables like armour kits, if you want an auction house side income too.
💰 What it means for your gold: Two leatherworkers each specced into a different armour type means you can take every leather and mail order your guild sends, instead of turning half of them away.
Engineering (crafting orders build)
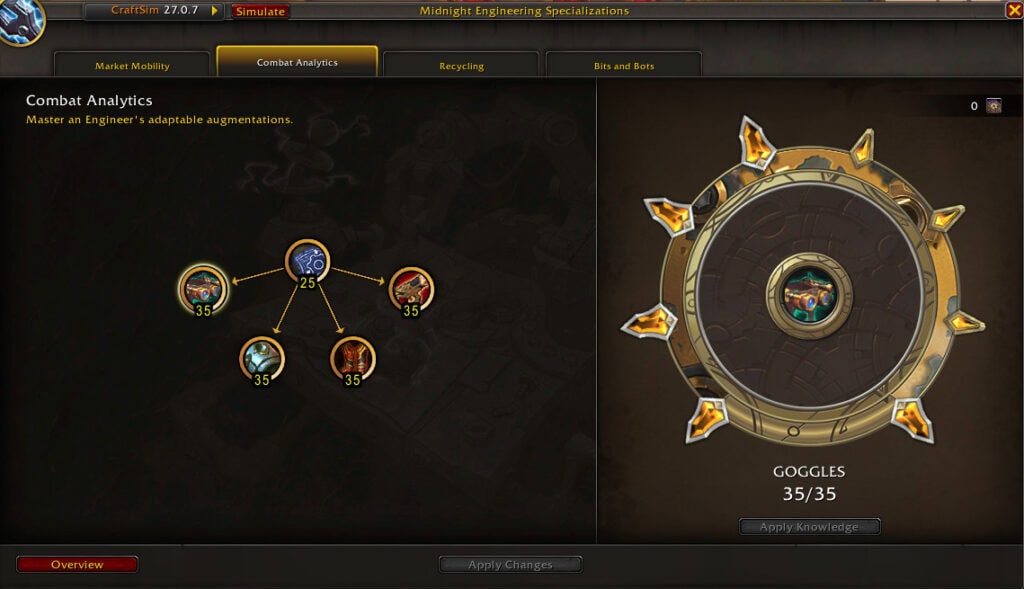
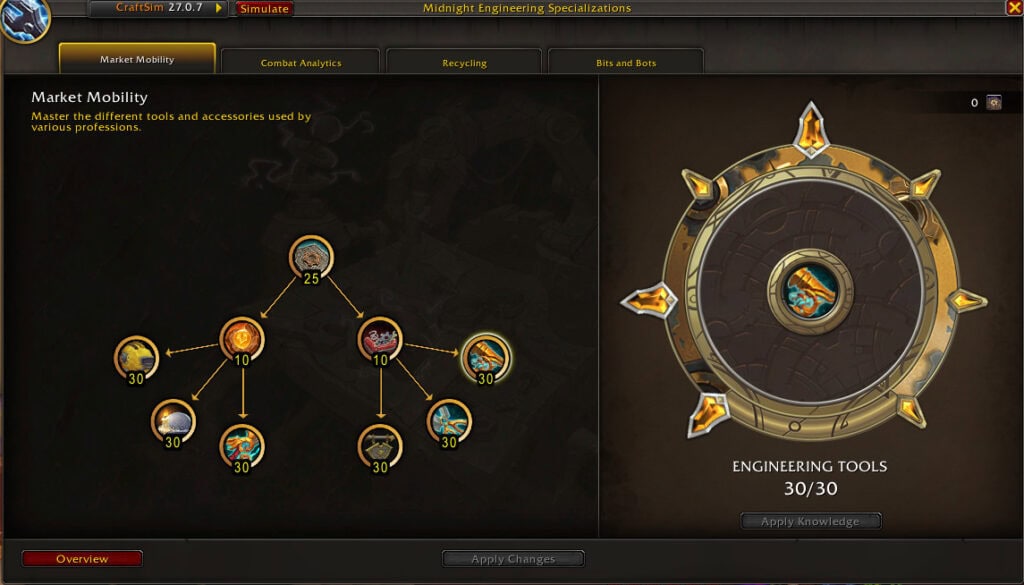
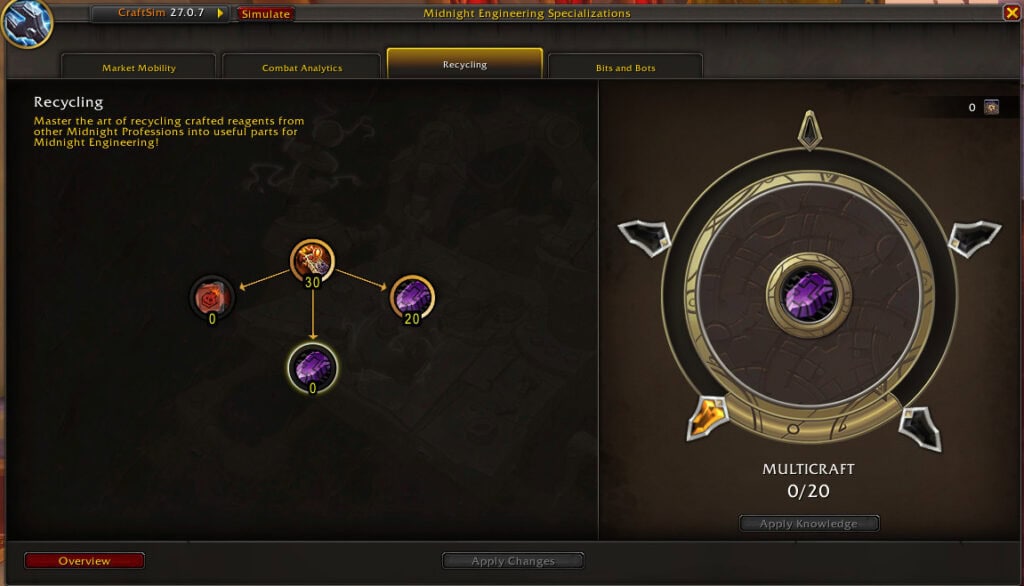
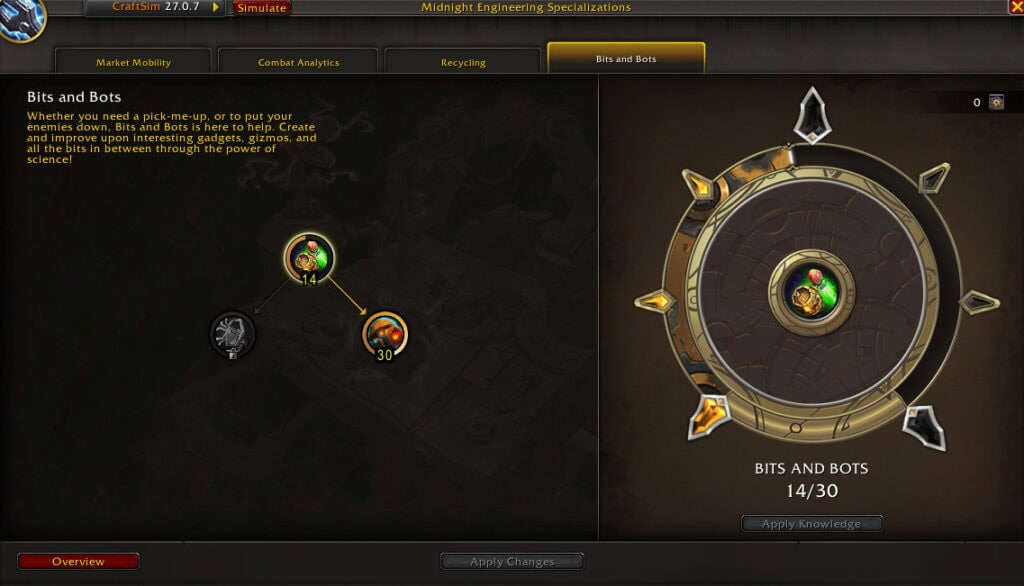
Market Mobility covers tools and accessories used by other professions. Combat Analytics covers an engineer’s gear, including goggles. Recycling turns crafted reagents from other professions into engineering parts. Bits and Bots covers gadgets and gizmos.
- Combat Analytics: max it for top-quality goggles and gear.
- Market Mobility: max the tool branches, because other crafters order these every season.
- Recycling and Bits and Bots with your leftover points.
💰 What it means for your gold: Engineering has two big order markets: combat gear for raiders, and profession tools for every other crafter. Covering both keeps the orders coming in all season.
Enchanting (mixed build)
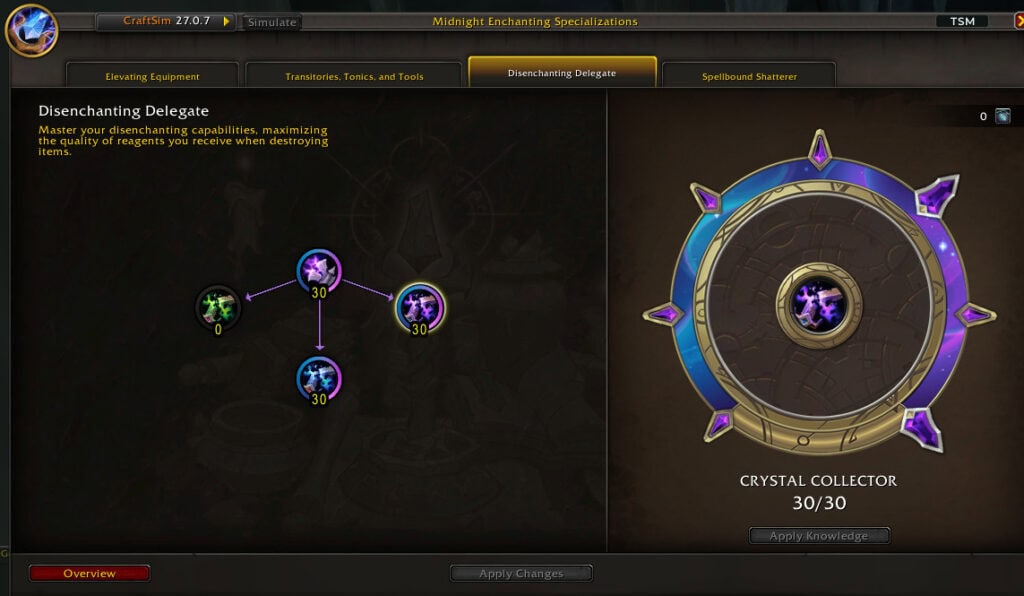
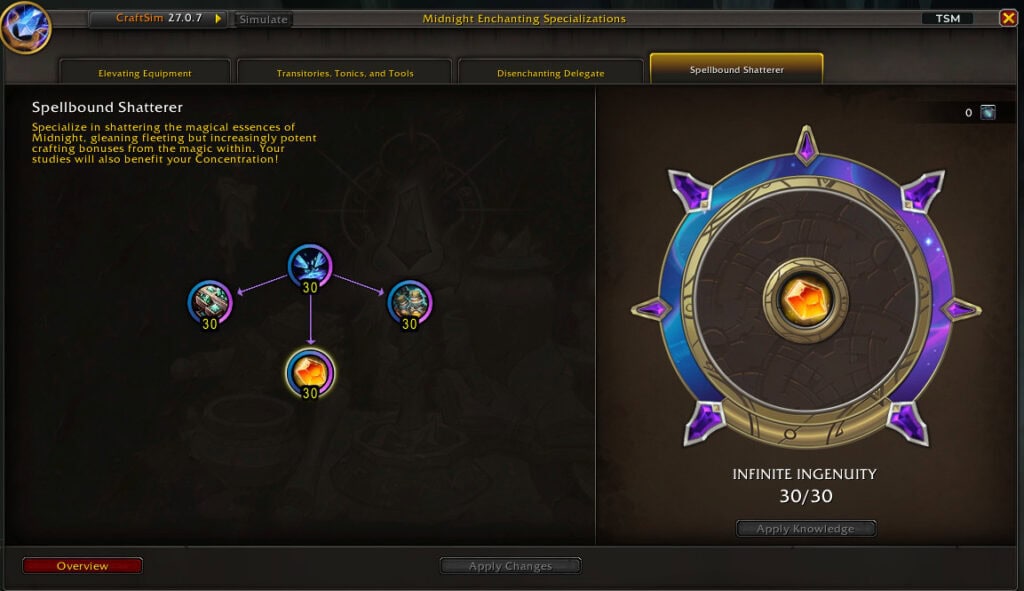
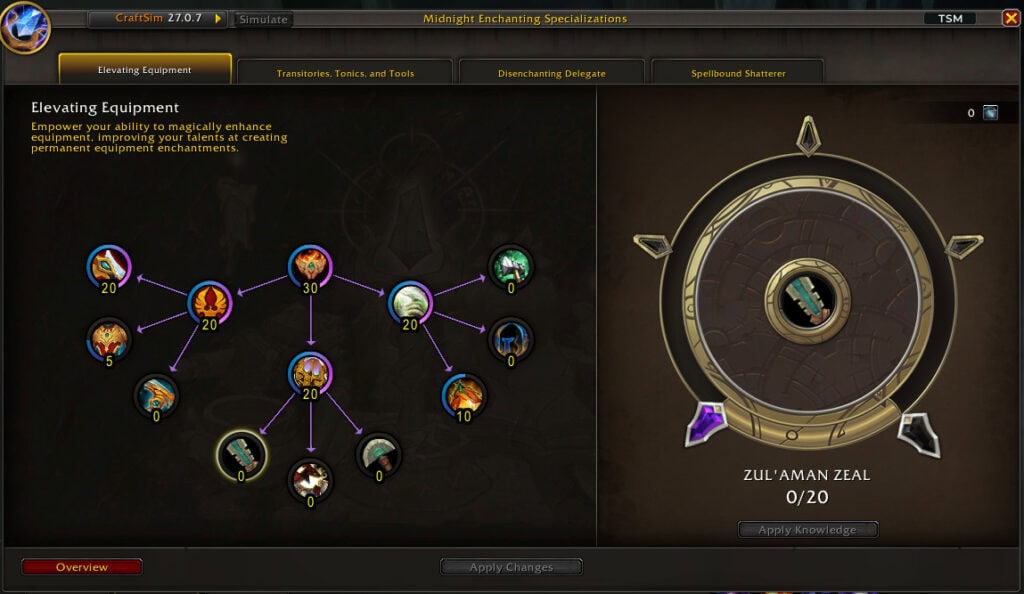
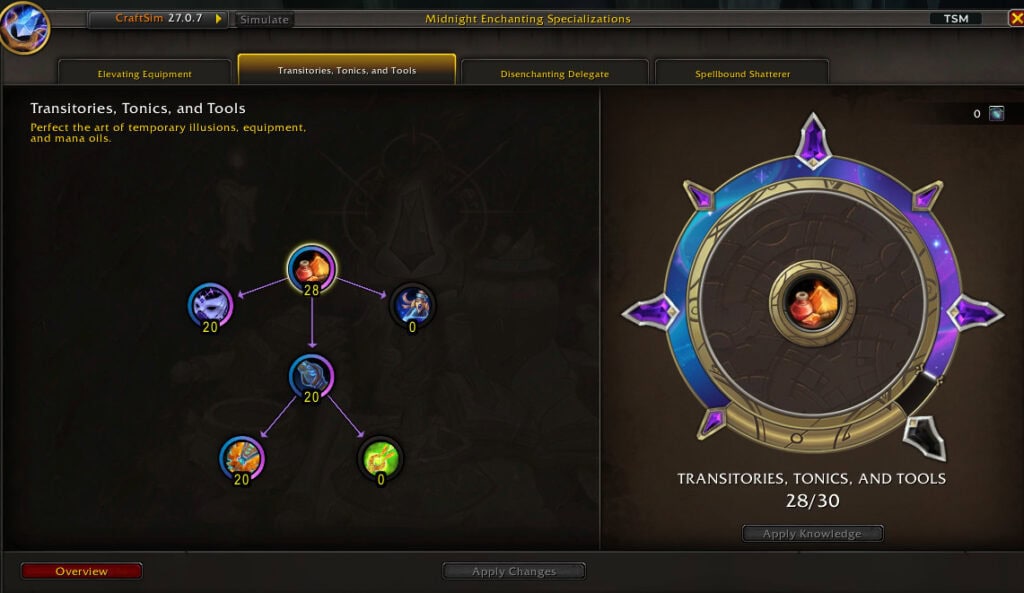
Elevating Equipment covers permanent gear enchants. Transitories, Tonics and Tools covers illusions, mana oils and enchanting tools. Disenchanting Delegate raises the quality of reagents you get from disenchanting. Spellbound Shatterer gives crafting bonuses from shattering essences, and also improves your Concentration.
- Disenchanting Delegate: max it early. Every enchanter disenchants constantly, so better reagents from every item adds up fast.
- Spellbound Shatterer: max it for crafting stats and extra Concentration, which matters most on your highest-value crafts.
- Elevating Equipment and Transitories for the enchants and oils you actually sell.
💰 What it means for your gold: Enchanting fits both strategies. Disenchanting old gear into top-quality reagents feeds the auction house, while maxed gear enchants bring in raid-season orders. See our Radiant Shard vendor flip and Concentration guide.
Alchemy (auction house build)
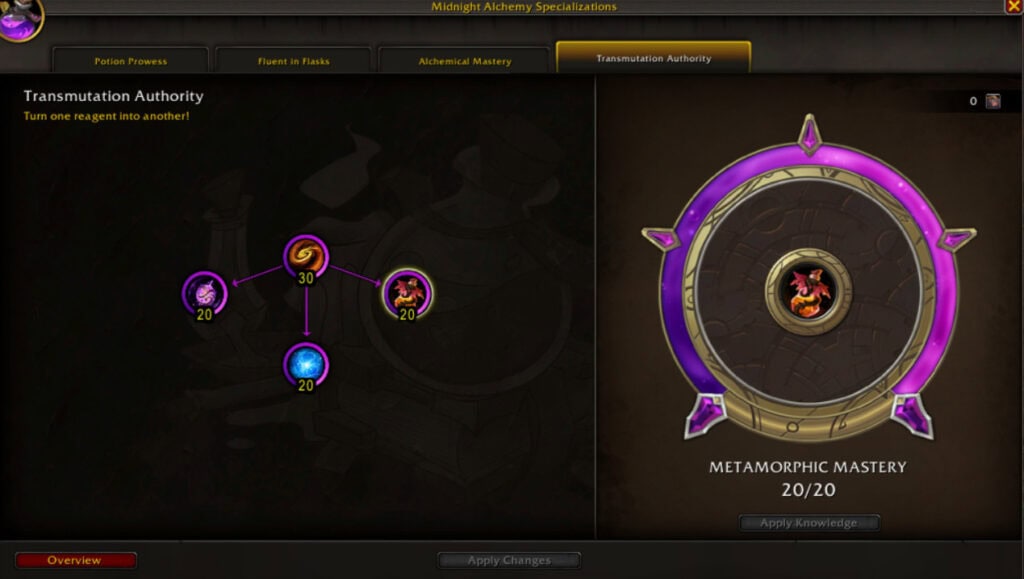
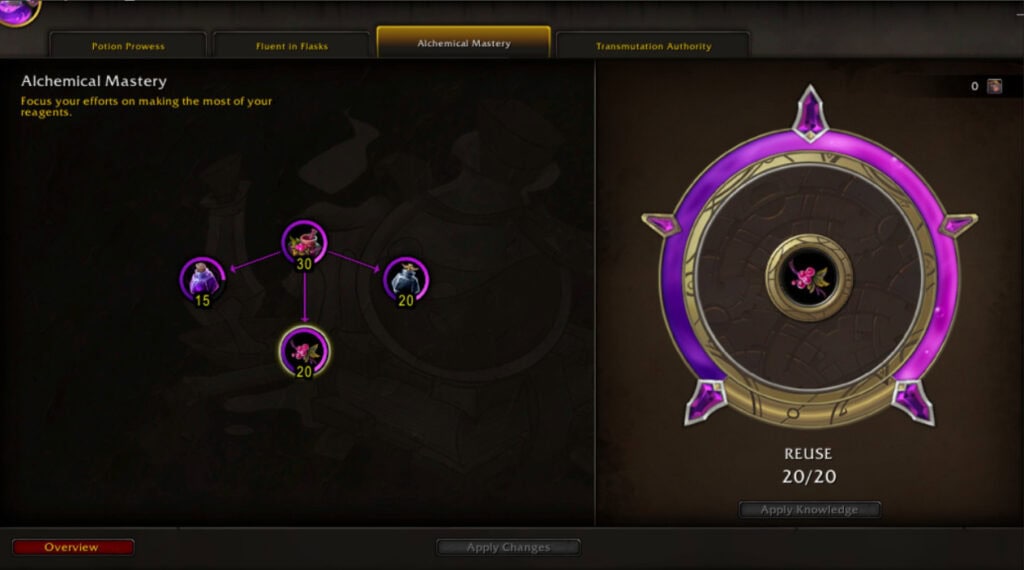
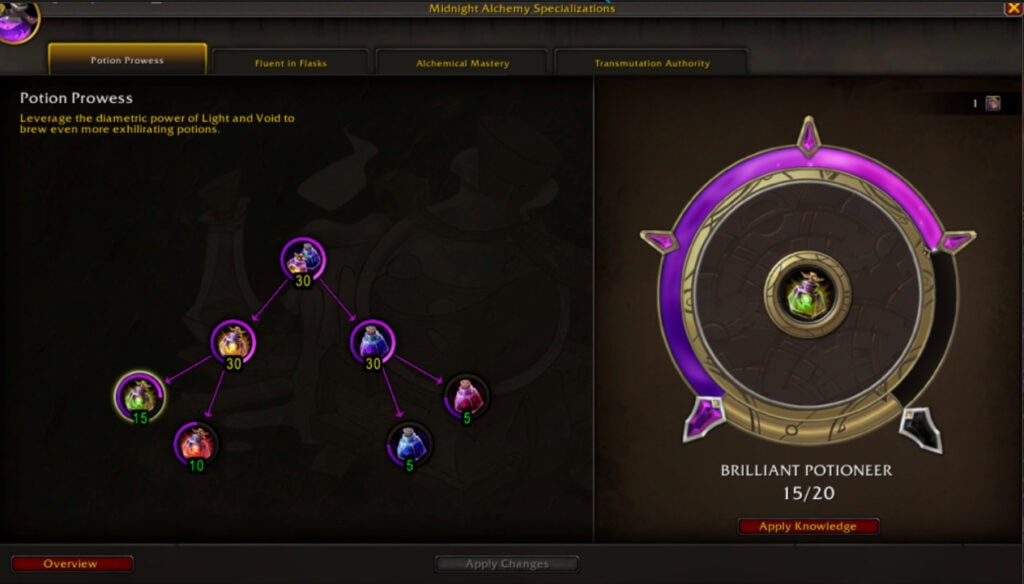
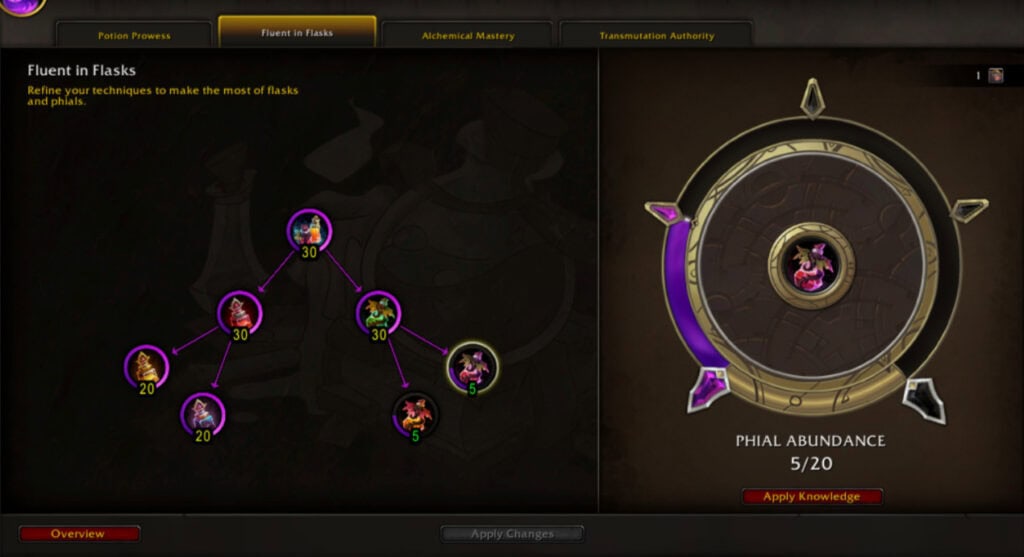
Potion Prowess covers potions, Fluent in Flasks covers flasks and phials, Alchemical Mastery is about getting the most from your reagents, and Transmutation Authority turns one reagent into another.
- Alchemical Mastery and Transmutation Authority first. Reagent efficiency helps every craft, and transmutes turn cheap materials into expensive ones.
- Then Potion Prowess and Fluent in Flasks, branching into the specific potions and flasks that sell best on your realm.
💰 What it means for your gold: This is Tina’s consumable strategy in its purest form. Raiders and Mythic+ players buy potions and flasks every week, so a well-specced alchemist has a steady income all season. Efficiency is what separates profit from break-even when you’re crafting hundreds at a time.
Inscription (crafting orders build)
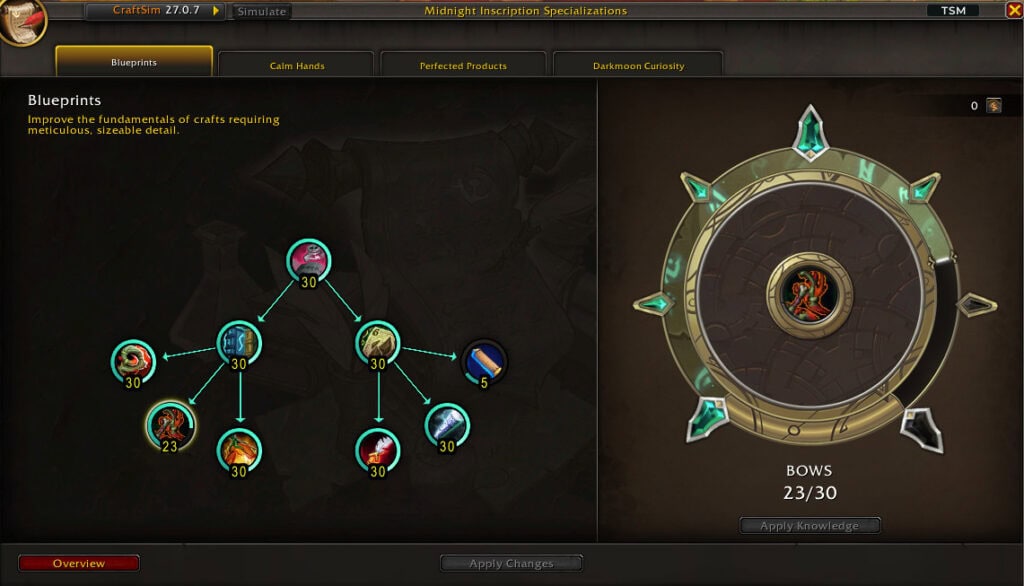
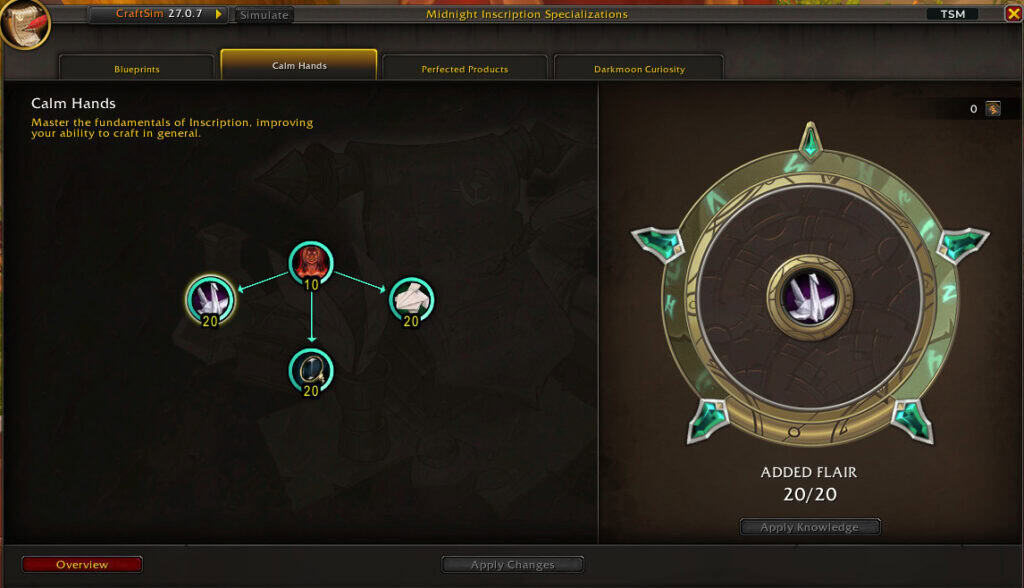
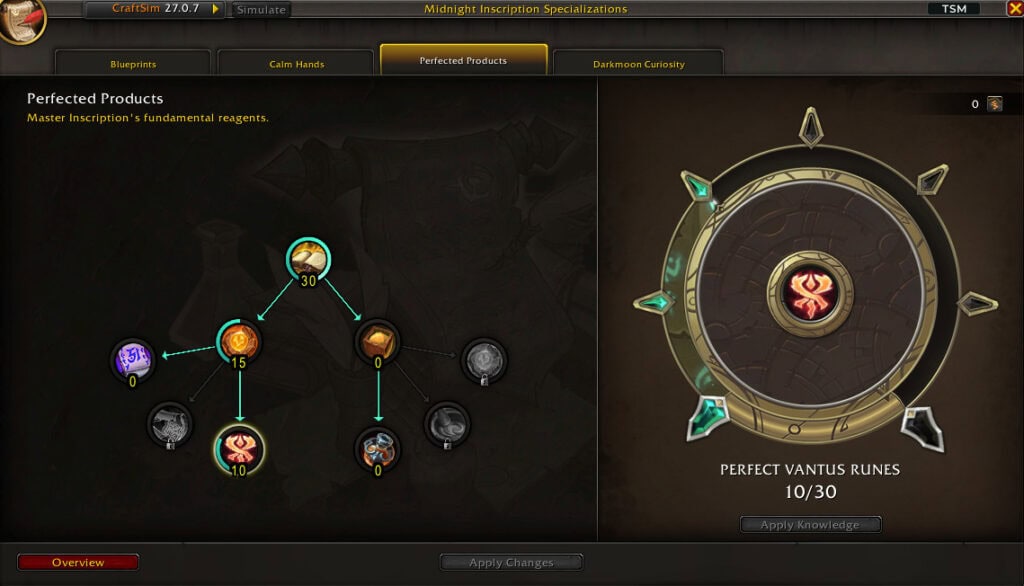
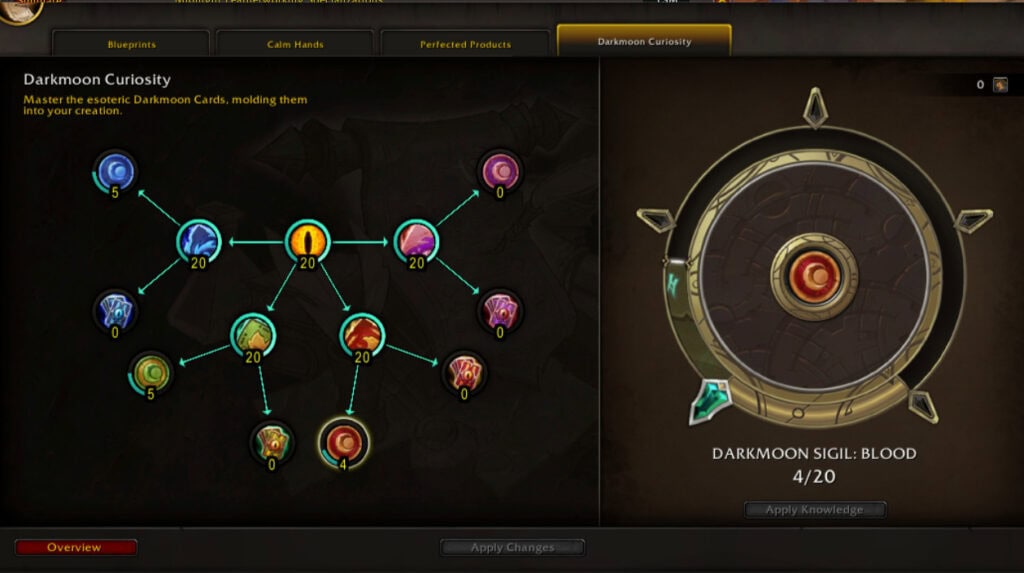
Blueprints covers crafts that need meticulous detail, including weapons like bows and staves. Calm Hands improves your crafting in general. Perfected Products covers inscription’s key reagents, like inks and Vantus Runes. Darkmoon Curiosity covers Darkmoon Cards.
- Blueprints: the centre and the item types you take orders for.
- Calm Hands: general crafting improvements that help everything.
- Perfected Products for the reagents and runes you sell.
- Darkmoon Curiosity is optional. Erosium skipped it entirely, while Tina built it out for Darkmoon cards, so treat it as a separate project.
💰 What it means for your gold: Inscription weapons and off-hands are steady order items, while inks and Vantus Runes give you an auction house income alongside. Skipping trees you won’t use is just as important as filling the ones you will.
Jewelcrafting (mixed build)
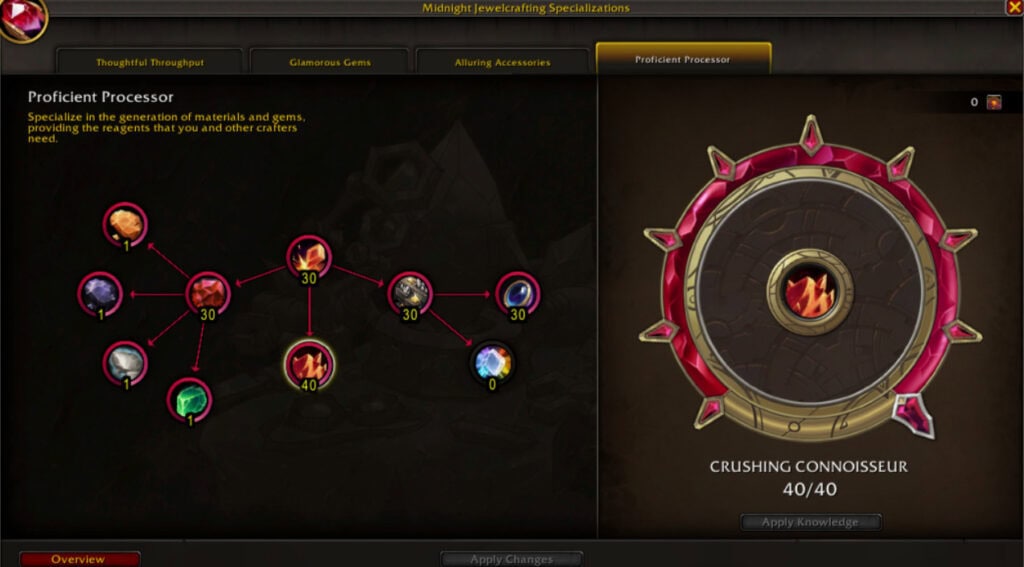
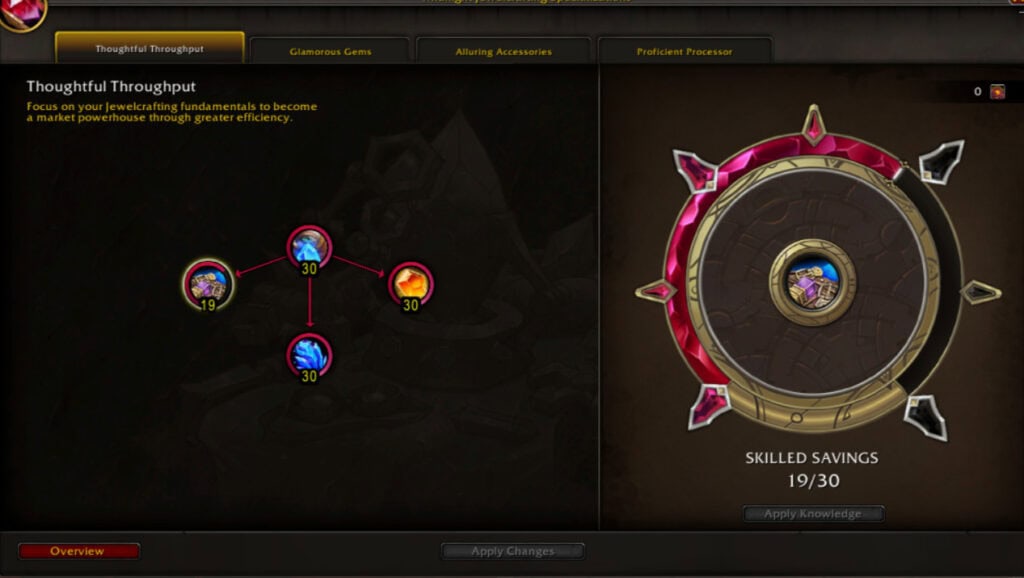
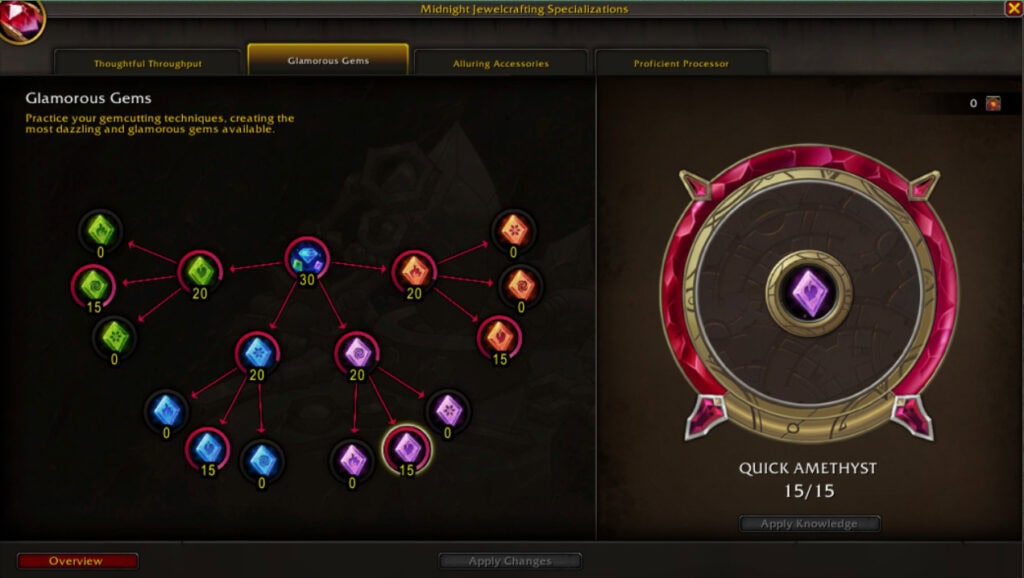
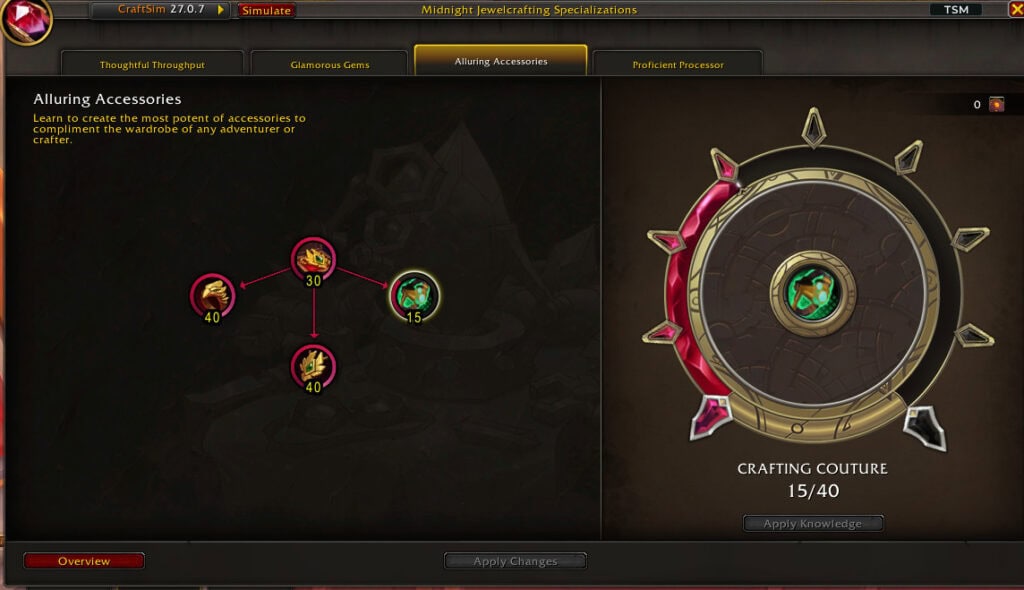
Thoughtful Throughput is about efficiency, for becoming a market powerhouse. Glamorous Gems covers gem cutting, Alluring Accessories covers rings and necklaces, and Proficient Processor covers prospecting and crushing to make the reagents other crafters need.
- Proficient Processor: max the crushing and prospecting nodes. You become a reagent supplier with a constant flow of materials.
- Thoughtful Throughput: efficiency, so every craft costs less.
- Glamorous Gems and Alluring Accessories: only the specific gems and jewellery you sell or take orders for.
💰 What it means for your gold: Gems sell every week to players gemming their gear, and top-quality rings and necklaces are popular crafting orders. Processing your own ore keeps your costs far below anyone buying from the auction house.
General rules for spending knowledge points
- Centre node first. It gives the most skill for the whole tree and unlocks the branches.
- Spec for what you sell. Don’t spread points evenly. Push the branches behind your best-selling items or most-requested orders.
- Decide your strategy first. Crafting orders want top-quality gear; the auction house wants efficiency on consumables.
- Skip what you won’t use. An unused tree is fine. Points spent there are points not making you gold.
- Use CraftSim. It shows exactly how each point changes your craft quality and profit before you commit.
- Spread professions across alts. Two crafters specced for different things cover twice the orders.
Get more from your professions
Ready to turn these specs into gold? Our Concentration guide shows how to stop wasting your best crafting resource, and Patron Orders covers another steady source of profession gold. Members get every profession guide in the library.
 MEMBERS
 FREE
 MEMBERS
 MEMBERS



Leave a Reply
You must be logged in to post a comment.